Thursday, 10 September 2015

Black Forest Cake


An overview of Black Forest Cake

Black forest cake suitable eaten at any time, but black forest cake most eaten during birthday parties or weddings. But have you ever wondered where the black forest cake originated? Okay, so that's pretty obvious, in the region of black forest in Germany, but who was it that first made the black forest cake and when? Well, let's find out all about the history of black forest cake.

The Black Forest region of southern Germany (Der Schwarzwald) is known for its sour Morello cherries and for Kirsch, or Kirschwasser, a double-distilled, clear cherry brandy made from them. It’s not surprising, then, that desserts made with both the cherries and the Kirsch are part of the regional repertoire. Its German name is Schwarzwälderkirschtorte, Black Forest Cherry Torte (torte is the German word for cake).

Black Forest Cake is a chocolate layer cake, with added layers of whipped cream and Kirsch-soaked morello cherries. The cake is then decorated with more whipped cream, morello or maraschino cherries, and chocolate curls or shavings. The cake layers are also soaked in a Kirsch syrup (although brandy or rum can be used). American recipes tend to omit the spirits to make the cake more family-friendly.

The earliest version of the recipe possibly dates back to the late 16th century when chocolate was first integrated into cakes and cookies (and was extremely expensive). The first “Black Forest Cake” was probably not a conventional cake but a dessert comprising cooked cherries, cream, Kirsch and a biscuit—similar to the original berry shortcake.

The original name of this popular German dessert is Schwarzwälderkirschtorte, Black Forest cherry torte. It is known by different names in different parts of the world. In India, its popular as black forest pastry, in the US, as black forest and in the UK, as black forest gateau. The authentic black forest is a multiple chocolate genoise layer cake which is soaked in Kirschwasser liqueur (a clear liqueur distilled from cherries) and covered with whipped cream and cherry filling.

In India most bakeries that offer black forest on the menu replace the Kirsch liqueur with tinned cherry syrup. The black forest cake that I have eaten and know of has 3 to 4 layers of chocolate cake, with whipped cream and maraschino cherries between each layer, topped with whipped cream and decorated with cherries and grated chocolate or chocolate shards. If you are planning on preparing sweet recipes for kids for a get together or birthday party, you should consider black forest cake. I used tinned maraschino cherries and Rich’s whipping cream. I’d suggest you do not skip the brewed coffee which gives a lovely flavor to the cake.

Well, whatever the original recipe for black forest cake is, after reading about black forest cake history, I am sure that you are already craving it! So go on and simply indulge!


Chocolate Cake Ingredients

  • 3/4 cups unsweetened cocoa
  • 2 cups cake flour
  • 1-3/4 cups sugar
  • 1-1/4 cups milk
  • 3/4 cup shortening
  • 1-1/4 teaspoons baking soda
  • 1 teaspoon salt
  • 1 teaspoon vanilla extract
  • 1/2 teaspoon baking powder
  • 3 large eggs

Chocolate Cake Preparation

STEP 1 : Preheat oven to 350°F. Grease two 9-inch round  

cake pans; dust with cocoa
.

STEP 2 : Using an electric mixer, on low speed with the

paddle attachment, incorporate all ingredients slowly; mix 

until well-blended.
  
STEP 3 : Increase mixer speed to high; mix for two more

minutes, scraping sides of bowl occasionally.

STEP 4 : Pour batter into pans. Bake for 30-35 minutes

until cake springs to the touch. Set aside to cool.
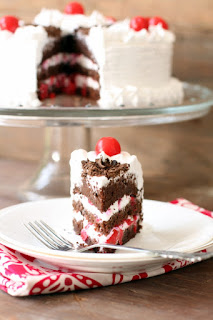


Black Forest Gateau
Black Forest Gateau
Black Forest Gateau


Black Forest Pastry


French Macaroons


FRENCH MACAROONS


Hi everyone. Nice to meet you all again. Today i would like to post entry about macaroons. As you know, macaroons is a dessert with full of sweetness. There are many types of macaroons's flavour such as white chocolate, ginger, caramel, cinnamon, hazelnut and many more. There is about 80% that people like this dessert because of it sweetness and the colour looks interesting. There are 2 types which is macaroons and macaron. This 2 types are very different shapes of the dessert.


THE ORIGINAL MACAROONS

The first macaroons were almond meringue cookies similar to today’s amaretti, with a crisp crust and a soft interior. They were made from egg whites and almond paste (a combination of equal parts of ground blanched almonds and sugar, mixed with egg whites—today glucose or corn syrup can be substituted). The name of the cookie comes from the Italian word for paste, maccarone (mah-kah-ROW-nay), and is also the word for pasta/macaroni and dumplings.While origins can be murky, some culinary historians claim that that macaroons can be traced to an Italian monastery—where they were modeled after the monks’ belly buttons!

The name derives from the Italian maccarone or maccherone, itself derived from ammaccare, meaning to crush or to beat. The reference is to the crushed almonds or almond paste, which is the principal ingredient.

Macaroons came to France in 1533 with the pastry chefs of Catherine de Medici, wife of King Henri II. Two Benedictine nuns, Sister Marguerite and Sister Marie-Elisabeth, seeking asylum in the town of Nancy during the French Revolution (1789-1799), paid for their housing by baking and selling the macaroon cookies, and thus became known as the “Macaroon Sisters” (the French word is macaron, pronounced mah-kah-RONE).


COCONUT MACAROONS

Italian Jews adopted the cookie because it has no flour or leavening (the agent that raises and lightens a baked good, like yeast, baking powder and baking soda—instead, macaroons are leavened by egg whites) and can be enjoyed during the eight-day observation of Passover. It was introduced to other European Jews and became popular as a year-round sweet.

Over time, coconut was added to the ground almonds and, in certain recipes, replaced them.Coconut macaroons are more prevalent in the U.S. and the U.K.—and they’re a lot easier to make and transport than the fragile almond meringues.


INGREDIENTS

  • 2/3 CUP ALMOND MEAL OR GROUND ALMONDS
  • 1 1/2 CUPS POWDERED SUGAR
  • 3 LARGE EGG WHITES, ROOM TEMPERATURE AND PREFERABLY AGED UP TO 3 DAYS
  • 5 TABLESPOONS GRANULATED SUGAR
  • 1 TEASPOON VANILLA EXTRACT


METHODS


  1. Preheat the oven to 280ºF, and position 2 racks in the lower section of the oven. Line 2 rimmed baking sheets with parchment paper. If you have time, draw 1-inch circles on the back of each sheet, spacing the circles at least 1/2-inch apart.
  2. If your almond meal is very coarse, grind it with the powdered sugar in a food processor until fine. Sift the almond meal-powdered sugar mixture twice through a mesh sieve.
  3. Place egg whites in the bowl of a stand mixer (or use a hand mixer), and begin to beat on medium-high. When the eggs are frothy, gradually add granulated sugar 1 tablespoon at a time until fully incorporated. Continue to beat the egg white mixture until glossy and stiff peaks form when you lift the beaters. Gently stir in the vanilla extract. Be careful to not overbeat the meringue (e.g., the meringue takes on a clumpy texture).
  4. Add half of the sifted almond mixture, and gently fold it into the meringue using a flexible silicone spatula. Lift from the bottom, up around the sides, and toward the middle, being careful to not overagitate the meringue and lose too much air. Once the almond mixture is predominantly incorporated, add the second half and repeat the folding motion.
  5. When the almond mixture is just incorporated, you will need to transform the batter into the appropriate texture. Using the flat of the spatula, "punch" down into the center of the batter, then scrape more batter from the sides to the center, and punch again. You will need to repeat this 10-15 times (or more, depending on your arm strength and the beginning texture of your batter) until the batter slowly and continuously drips back into the bowl when you scoop it up with the spatula. Think of the consistency of molten lava. For the best results, punch the batter a few times, check the consistency, then punch a few more times, etc. Do not make the batter too runny or the macarons won't rise as they should, and you could end up with oil stains on the surface.
  6. Pour batter into a pastry bag fitted with a 0.4-inch tip. In a pinch, you can also use a gallon-size Ziploc bag: just snip a teeny bit from one of the bottom corners. Twist and clip the top of the bag to avoid overflow. On your prepared baking sheets, pipe out 1-inch rounds in the circles you drew (remember to draw the circles on the back side of your parchment to avoid ink or pencil stains on your macarons!).
  7. Holding the baking sheet in both hands, rap each baking sheet firmly on the counter two or three times. This smooths out the tops and helps form the "pied" or frilly foot on the bottoms of the macarons. Allow the piped macarons to dry, uncovered, for at least 15 minutes. The macarons should form a very thin, smooth crust where, if you tap it lightly with your finger, the batter will not stick to your finger. If after 15 minutes, the batter is still sticky, let it dry longer. This may take up to an hour on humid days.
  8. Place both baking sheets in the oven and bake for 15-18 minutes. After the first 2 minutes, open the oven to allow any excess humidity to escape. Halfway through, swap oven racks and rotate the sheets for even baking. The macarons are done when they are baked all the way through and the shells are just hard. Take care to not underbake (insides will still be mushy) or overbake (tops will begin to brown). Remove them from the oven, and cool on baking sheet placed on a wire rack.
  9. When fully cooled, assemble the macarons with your choice of filling. The assembled macarons can be stored in an airtight container in the refrigerator for up to one week.


COCONUT MACAROONS

ORIGINAL MACAROONS


                          HOW TO MAKE A MACAROONS?


Chocolate Brownies


This is an updated history with new source materials and print outs of older source materials. It pushes the first published “chocolate brownie” recipe back to 1904. However, more sources are needed to accurately complete the history. Does anyone have access to the following Boston Cooking School Cook Book editions: 1900, 1901, 1902, 1903, 1904, 1905, 1906, or any other editions up to 1910? A print out or accurate copy of the brownies recipes in those editions is needed.

What country do brownies come from?
Chocolate brownie. A chocolate brownie is a flat, baked square or bar developed in the United States at the end of the 19th century and popularized in both the U.S. and Canada during the first half of the 20th century.

How long does it take for brownies to cook?
Bake for 30-35 minutes. Test with a knife to see if the center is done. If the knife comes out clean, let the brownies rest before serving. If the knife comes out with batter still on it, allow the brownies to bake about 5 minutes more.

If you're still trying to figure out how you can possibly make gooey chocolate brownies without eggs, this recipe will show you how. Enjoy!

INGREDIENTS
  • 200g unsalted butter, chopped
  • 200g dark chocolate, broken into pieces
  • 1 cup brown sugar
  • 3 eggs, lightly beaten
  • 1 teaspoon vanilla extract
  • 3/4 cup gluten-free plain flour
  • 2 tablespoons cocoa powder


METHOD

Step 1
Preheat oven to 190°C. Line a 5cm deep, 18cm (base) square cake pan with non-stick baking paper.
Step 2
Heat butter, chocolate and sugar in a saucepan over low heat, stirring constantly, until melted and smooth. Transfer to a heatproof bowl. Set aside to cool slightly.
Step 3
Add eggs and vanilla to chocolate mixture. Mix well. Sift flour and cocoa over chocolate mixture. Stir to combine.
Step 4
Pour brownie mixture into pan. Bake for 20 minutes or until just set. Set aside to cool. Once cooled, lift out. Wrap in plastic wrap. Place into an airtight container. Stand for 1 day. Cut into pieces. Serve.

Now let’s focus on these FABULOUS Double Chocolate Brownies!

Double Chocolate Vegan Brownies

INGREDIENTS
  • 1/3 cup brewed coffee
  • 1 tablespoon non-hydrogenated vegan margarine (like Earth Balance)
  • 1 ounce semi-sweet chocolate, finely chopped
  • 1 1/4 cups plus 2 tablespoons sugar
  • 1/2 cup cocoa powder
  • 3/4 teaspoon salt
  • 1/3 cup canola oil
  • 1/3 cup water
  • 1/2 tablespoon pure vanilla extract
  • 1 cup plus 1 1/2 tablespoons all-purpose flour
  • 1/2 teaspoon baking powder
  • 1/4 cup plus 2 tablespoons semisweet chocolate chips

METHOD


STEP 1
Preheat oven to 350 degrees and lightly grease an 8×8 inch baking pan.
STEP 2
Combine coffee, margarine, and 1 oz. semisweet chocolate in a microwave safe bowl and carefully microwave 30-45 seconds or until melted and smooth. Stir to thoroughly combine.
STEP 3
In a bowl of standing mixer fitted with the paddle attachment (OR using a hand mixer), combine sugar, cocoa powder, and salt. Mix to combine.
STEP 4
Add the oil, water, and vanilla, mix to combine.
Add coffee mixture and continue to mix to combine.
STEP 5
In a separate bowl, mix together the flour and baking powder. Stir in the chocolate chips. Add the dry ingredients to the wet ingredients and mix until all the ingredients are incorporated.
STEP 6
Pour the batter into the prepared baking dish and bake for 30 minutes or until a toothpick inserted into the center comes out clean. Cool completely.

Vegan double chocolate brownies sound absolutely grand! I am so pleased that there are recipes out there for our viewers who prefer the vegan diet.

I absolutely love good rich gooey brownies.  I am not a vegan, so I have not tried this recipe myself.  Judging from the photo, they must be pretty great.


So enjoy enjoy enjoy! I love these and I really hope you all do too! These aren't just for the vegans 


Monday, 7 September 2015

Red Velvet Mug Cake


Need an easy, yet delicious treat to make for Valentine’s Day? This recipe for Red Velvet Cake in a Mug is perfect for you and your sweetie! And when I think of Valentine’s Day treats, the first thing that comes to mind is ANYTHING red velvet. If Valentine’s were to have a taste to it, I’m sure it would taste like red velvet. Now how about overview of red velvet cake. let's read all.

Red Velvet experienced an explosion of popularity in the last few years. Besides the namesake cake, Red Velvet is now available in cupcake form along with pancakes, cookies, ice cream, and even lattes! The cake has gained popularity in the 20th century, but its roots stretch further back. Like with many recipes, the Red Velvet Cake’s true origins aren’t completely known. However its history can be traced back over the years thanks to cookbooks, recipes, and advancements in food production. 

Introduction to The American Diet
The Adams Extract company attributes itself to making the “original” Red Velvet cake in the 1920s. Currently you can buy the mix from the company in its vintage packaging. The Waldorf Astoria Hotel in New York City also claims it is the birthplace of the Red Velvet cake, with it being a popular menu item in the 1950s. Some argue that the Red Velvet cake started in the south. While there is no one clear answer, we do know that something between the 1920s and the 1950s, Red Velvet became popularized in the United States. 

Cake Ingrediants

4 T self rising flour (all purpose works as well, but you will 

need to add 1/8 tsp baking powder to your cake batter)

4 T sugar

2 T cocoa powder

3 T milk

3 T vegetable oil

1 egg

½ tsp red gel food coloring (or 1 T liquid)


Frosting Ingredients

4 T butter, softened

2 oz cream cheese, softened

¼ tsp vanilla extract

1 cup powdered sugar


Directions


Mix together flour, sugar, cocoa powder milk, vegetable oil,

and egg. Stir in food coloring, and pour into greased mug 

(at least 8 oz capacity). Microwave for 1 1/2 -3 min (cooking

times may vary. I cooked mine at 70% power since I have a 

strong microwave, but cook according to your own) 

For frosting, cream together butter and cream cheese until

smooth. Mix in vanilla extract, then add powdered sugar and

mix. Spread/pipe on top of mug cake.

Red Velvet Cake in a Mug (for two)

Cake Ingredients

1 cup plus 2 tablespoons Red Velvet Cake Mix (I used Duncan Hines) - divided

6 tablespoons vegetable oil, divided

6 tablespoons water, divided

Directions

Evenly split the ingredients into two medium-large sized microwave-safe mugs. That means 1/2 cup plus 1 tablespoon of Red Velvet Cake Mix, 3 tablespoons of vegetable oil, and 3 of tablespoons water per mug. Stir until throughly combined and smooth.
Microwave the mug cakes, one at a time, for 2 minutes on high. CAREFUL when handling mugs after microwaving, they will be HOT.

Let cakes cool for at least 5 minutes before serving. Sprinkle some powdered sugar, if desired. Enjoy!


Red Velvet that had been eaten